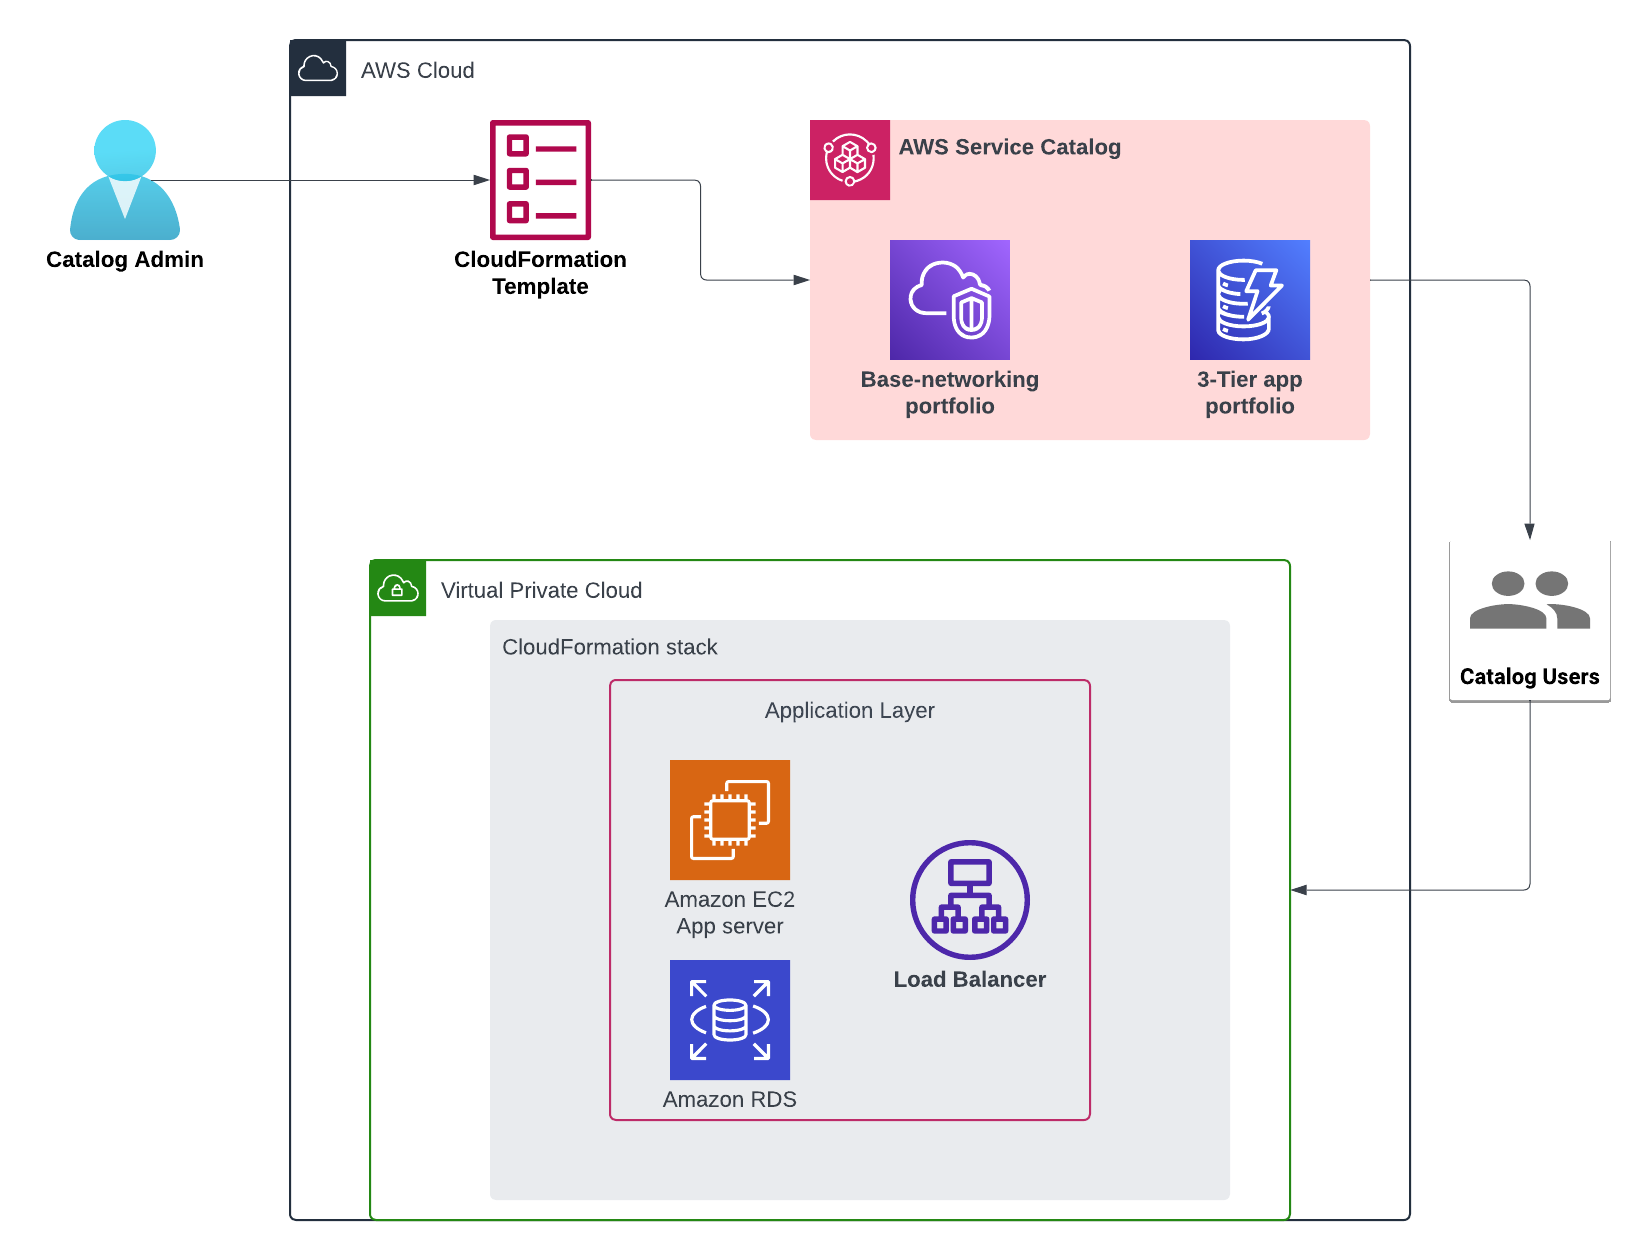
AWS Service Catalog is a service provided by Amazon Web Services (AWS) that enables organizations to create and manage catalogs of IT services. These catalogs consist of a set of approved resources, including virtual machine images, servers, databases, and software applications, which users within the organization can provision on-demand. AWS Service Catalog helps organizations maintain control over their cloud infrastructure by allowing administrators to define standardized configurations, enforce compliance policies, and manage access permissions. By centralizing the management of IT services, AWS Service Catalog promotes consistency, reduces operational overhead, and improves security posture within the organization’s cloud environment.

As businesses increasingly embrace cloud computing for their operations, the need to maintain control and governance over resources becomes paramount. Amazon Web Services (AWS) Service Catalog offers a streamlined solution to this challenge. With AWS Service Catalog, organizations can create curated catalogs of pre-approved IT services, enabling users to provision resources quickly while adhering to compliance standards and best practices. In this blog, we’ll explore the foundational principles of AWS Service Catalog and its role in simplifying the deployment of essential services like web applications hosted on EC2 instances, databases managed by RDS, and load balancers. Through this exploration, we’ll discover how AWS Service Catalog empowers businesses to achieve agility and compliance simultaneously in their cloud environments.
Step 1: Go to the Service catalog console and navigate to portfolios and click on Create portfolio.


Enter the portfolio details and click on Create.
Step 2. Create a Product: Within your portfolio, click on “Products” and then “Create product.”
Enter the product details:

Step 3. Create a version for the launching process:
While creating a product version you have different options like selecting the template by storing your template in S3 and providing the URL or you can directly upload the template.
In this case, we have uploaded the template directly.

Given below is the CloudFormation template we have used for deploying our resources.
Resources:
WebServerInstance:
Type: AWS::EC2::Instance
Properties:
InstanceType: t2.micro
ImageId: ami-07bff6261f14c3a45
KeyName: gen4-key-pair
UserData:
Fn::Base64: |
#!/bin/bash
yum update -y
yum install -y httpd
service httpd start
chkconfig httpd on
MyDBInstance:
Type: AWS::RDS::DBInstance
Properties:
Engine: mysql
DBInstanceClass: db.t3.micro
MasterUsername: myuser
MasterUserPassword: mypassword
AllocatedStorage: 20
DBInstanceIdentifier: gen4databaseinstance
MyLoadBalancer:
Type: AWS::ElasticLoadBalancing::LoadBalancer
Properties:
Listeners:
– LoadBalancerPort: ’80’
InstancePort: ’80’
Protocol: HTTP
HealthCheck:
Target: HTTP:80/
HealthyThreshold: ‘3’
UnhealthyThreshold: ‘5’
Interval: ’30’
Timeout: ‘5’
Instances:
– Ref: WebServerInstance
Scheme: internet-facing
Subnets:
– subnet-26085b5f
This template is used for creating EC2 Instances, RDS instances, and Load Balancers.
While giving the details for the EC2 instance you have to specify the key pair. To create the key pair you can follow the following steps:
- Go to the EC2 console and navigate to the Key Pairs tab located toward the left console:
- Click on Create Key Pair and enter the required information.
- After creating the key pair you have to put the Key Pair name in your CloudFormation template code.

After setting up the necessary details click on Create.
Step 4: Now click on the portfolio you have created earlier and navigate to the Constraints tab:

Click on Create Constraints, Fill in the Constraint details and Inside the Product, select the product you created earlier and the constraint type as Launch

Inside the Launch Constraint, you can select an existing role.

If you are not a root user then you have to grant access to the user to see your product on the product list. If you are a root user then you can see your product on the product list.
To grant access to the user navigate to the portfolio, look out for the access tab, and grant access to the user:

Step 6: Create a provisioned product

Step 6: Go to the product console and select your product and click on Launch Product

Fill in the required information and launch your product.
After you launch the product you can see the resources being created.

You can check if the resources are created or not and Created RDS.

Created EC2 Instance:

Created Load Balancer:

By centralizing the management and provisioning of IT services, AWS Service Catalog enables organizations to streamline their operations, reduce administrative overhead, and accelerate innovation. Through curated catalogs of pre-approved resources, businesses can empower their teams to deploy essential services with ease, all while ensuring adherence to internal policies and industry regulations. As we continue to navigate the dynamic landscape of cloud computing, AWS Service Catalog remains an indispensable asset, enabling organizations to achieve the delicate balance between agility and control in their cloud environments. Embracing AWS Service Catalog unlocks a world of possibilities, where efficiency, security, and compliance converge to drive success in the digital era.
 Finland
 Bangladesh
