Hey, Want to create a website without having to learn coding? I‘ve put up a solution for beginners like you. Creating a website in 2021 is no big deal, with platforms like WordPress, Squarespace, and Wix we can easily create websites. In this blog, I will share a quick and simple guide to creating a WordPress website.
So let’s jump into WordPress
Before we get started, Let’s talk about what makes WordPress the ideal option to develop a website. After all, there are numerous ways for building a website. So what’s the deal with WordPress
What exactly is WordPress, & why should you choose it?

WordPress is the most popular CMS globally, with nearly 40.6% of active websites (data says) using it as a base. WordPress offers some distinct advantages that have helped it become the most popular. The most important feature is that WordPress is open-source and absolutely free. That is, you are free to use and alter it as you see fit.
“What You See Is what you get”
Here are some of the key attributes of WordPress:
- Fully customizable designs
- it’s extra versatile – can run any type of website
- it’s fast, optimized, and secure 55,000+ plugins for impeccable site experience
- Over 3,000 beautiful and professional themes
- SEO Friendly
- Mobile responsiveness
But wait,
You might be wondering- I said WordPress is FREE to use & yet you heard people saying they paid for a website built on WordPress.
To clear this up, let’s talk about the differences between WordPress.com and WordPress.org.
WordPress.com vs. WordPress.org

With that, let’s look at the step-by-step process of building a WordPress website from scratch.
Step 1: Register a domain name

Before you learn how to make a WordPress website for beginners, You’ll need a domain name for your website. A domain name is the address of your website on the internet, in case you didn’t know. It aids internet visitors in finding your website on the internet.
Your website’s permanent Internet address is known as a domain name. Here the website domain name, for example, is genesesolution.com.

To obtain a domain name, go to a domain name provider’s website, such as Nepal’s official .np Domain Registration, Gurkha.Host, Namecheap, and so on.
It’s similar to your house address, representing where in the world your house is located.
Here are Some tips for choosing your website domain name:
- The domain name must be relevant to your site content.
- Try including keywords related to your business if possible and sound good. For example, if I create a food blog, I can include keywords like “food”, “foodie”, etc.
- Keep it short and simple.
- Select an appropriate extension like .com, .org, .net, and more. They convey some specific meaning; for instance, .com is used for a commercial while .org is for organizations. So, choose based on what your website is all about.
Step 2: Buy a Web Hosting
The engine that drives your website is web hosting. It’s required if you want others to be able to access your website. It’s much easier than you think to purchase web hosting since the companies have made a lot of effort to make sure that the whole process is simple. The best way to build a WordPress website is through a hosting service provider that has been officially recommended by WordPress.
When you explore web hosting providers such as Bluehost, SiteGround, DreamHost, you could see they provide different types of hosting services, like:
- Shared
- Managed WordPress
- Virtual Private Server (VPS)
- Dedicated
- Cloud
So, you can choose any one of the above hosting plans based on the website type you want to create after assuming the need for memory, space, and other resources along with the cost.
Here you can explore other Web Hosting Companies from Nepal: Top Web Hosting Companies in Nepal.
Step 3: Install and configure WordPress website
After you have bought your domain name and web hosting, you will receive an email from the support team with details you can use to access your profile and start working on your website.
To make things simpler, Many hosting providers offer quick and simple one-click WordPress installations or manual ones.
For example, if you choose Bluehost, it shows a simple wizard to move ahead with the installation.

- In cPanel, scroll down and hit the “WordPress” icon.
- You will see the Quick Install option to download WordPress. Click on “Get started”.
- Next, select your domain name. It’s where your WordPress site will be hosted. Click “Next”.
- Enter your site name, admin password, and admin username. Click on “install” to continue.
- Once your installation completes, it will show a message – “Installation complete”.
When you are done, congrats, you can start doing the most interesting task – picking pieces of functionality and design for your WordPress site!
Now, Click on the link provided to find your WordPress login URL along with the password.
Log in with your username and password to start working on your new website.
***If you need to install WordPress manually, the process is a bit more time-consuming, but not difficult. You may check out the official guide by WordPress.ORG on How to install WordPress.
Basically, you’ll need to download WordPress, upload your files to the domain name folder, create a database, point your browser to the domain name and follow the instructions.
Congratulations! You have created your first WordPress website.
You can now head over to the WordPress login page. You can always access your dashboard by going to:
yourdomain.com/wp-admin
You can log in to your WordPress site using the admin username and password you entered earlier.

After logging in successfully, you’ll see the main WordPress interface:

Now let’s move on to the next step and choose a design for your website.
Step 4: Choose a WordPress theme and plugins
Now comes the exciting part, the design, and the appearance!
The good news is that you can customize everything in WordPress to make it look just the way you want. To do so, you’ll make use of a WordPress theme or template.
In simple terms, a WordPress theme provides a pre-designed look for your website and its posts and pages. It’s the main design layout or the integral part of your site’s outlook.

Where to Find the Best WordPress Themes?
The easiest place to get free themes for your site is from the Official WordPress themes repository. There are over 7700 themes to choose from and all of them are free to boot. As a result, you can set up a WordPress site to look beautiful for absolutely free.
Similarly, you can install some useful plugins into your website for added functionalities like better security, SEO, contact forms, Google Analytics, and more.
Currently, WordPress provides over 55,000 plugins completely FREE at your disposal.

Step 5: Add Content to Your Website
WordPress comes with two default content types called posts and pages. Posts are part of a blog and appear in reverse-chronological order (newer items displayed first).
On the other hand, pages are meant to be static “one-off” type content such as your about page, contact page, privacy policy, etc.
How to Create Posts and Pages in WordPress?
Creating web Pages and Posts using WordPress is quite similar to each other. From your dashboard, first, select the Posts/Pages option on the sidebar. This will bring you to the page where all your posts/pages will be listed.

Now to create a new post or page, just click on the ‘Add New’ button at the top.
This is going to bring you to the WordPress Post Editor. Here, you can add all kinds of content, including text, images, galleries, and more. It’s all fairly intuitive so no need to worry.

Once you’re done preparing the content, just click on the ‘Publish’ button on the top right.
Step 6: Customize your WordPress website
Beyond the theme you choose, there are a number of ways to further customize your website. Let’s review a few options.
First, let’s customize your site title. From your admin dashboard, select Settings > General. Here, add your website title and tagline. You can also toggle other basic site information like your URL, email, time zone, and more.

Next, let’s customize your reading sections. Under Settings > Reading, you can change your homepage to a static page.

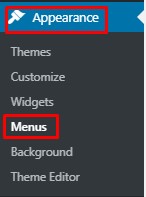
Now, To create a WordPress menu, go to Appearance>Menus from your WordPress dashboard.

Step 7: Managing WordPress Security
Now that you’ve created your own WordPress website, added content to it, you’re almost done. But there are a few really important things you should work on immediately. Let’s begin with security.
There are some easy steps you can take that’ll make your WordPress site more secure:
1. Keep WordPress Updated

2. Keep your Themes and Plugins Updated

3. Enable SSL

4. Backup your Websites Regularly
Here are some of the best WordPress plugins you can use for Security:
Step 8: Optimize your content for SEO and website performance
Utilize SEO plugins like Yoast SEO and optimize your content for SEO to increase your visibility. Optimize permalinks, headings, titles, subheadings, videos and images, and other media.
Similarly, speed plays a major role in the success of your website.
As nobody likes to wait, don’t let visitors slip off your site due to poor page loading speed.
You can improve your website’s performance by enabling browser caching. Browser caching is the process of temporarily storing your website’s data on your visitors’ browsers. That way, your content doesn’t need to be sent from the webserver for it to appear in the browser, which increases the website speed.
To enable caching for your website, install and activate a caching plugin like W3 Total Cache.
Wrapping Up
That’s it! You’ve just learned how to start a WordPress website!
As you can see, the process is simple enough. The great thing about WordPress is that even absolute beginners will be able to have a site of their own in no time.
I hope this article made the whole process clear to you. If you have any questions, feel free to let us know in the comment sections below.?
 Finland
 Bangladesh
