Unveiling the Power of AWS Glue
In an era dominated by data-driven decision-making, businesses are entrusted with vast amounts of sensitive information. Protecting Personally identifiable information(PII) is not only a legal requirement but also a crucial aspect of maintaining customer trust. Identifying and protecting sensitive data at scale has become increasingly complex, expensive, and time-consuming. With the rise in cloud computing, AWS Redshift has become a popular choice for storing and analyzing large datasets. AWS Glue, a fully managed service, seamlessly integrates with Redshift to provide a comprehensive solution for data processing. In this blog, we’ll delve into the process of detecting and securing Personally Identifiable Information within your Redshift data warehouse using AWS Glue.
Understanding Personally Identifiable Information(PII)
PII includes information that could potentially identify a specific individual. This can range from basic details such as names, addresses, and phone numbers to more sensitive data like social security numbers, financial information, and medical records. The identification and protection of PII are essential for complying with data protection regulations and maintaining the privacy and security of individuals.
Solution Overview
With this solution, we detect PII in data on our Redshift data warehouse so that we take and protect data.
- Amazon Simple Storage Service(s3): It is an object storage service that offers industry-leading scalability, data availability, security, and performance.
- Amazon Redshift: It is a data warehouse service that uses SQL to analyze structured and semi-structured data across data warehouses, operational databases, and data lakes, using AWS-designed hardware and machine learning to deliver the best performance at any scale.
AWS Glue: It is a serverless data integration service that makes it easy for analytics users to discover, prepare, move, and integrate data from multiple sources. Here, AWS Glue is used to discover the PII data stored in Amazon Redshift.
The diagram below illustrates the solution architecture.
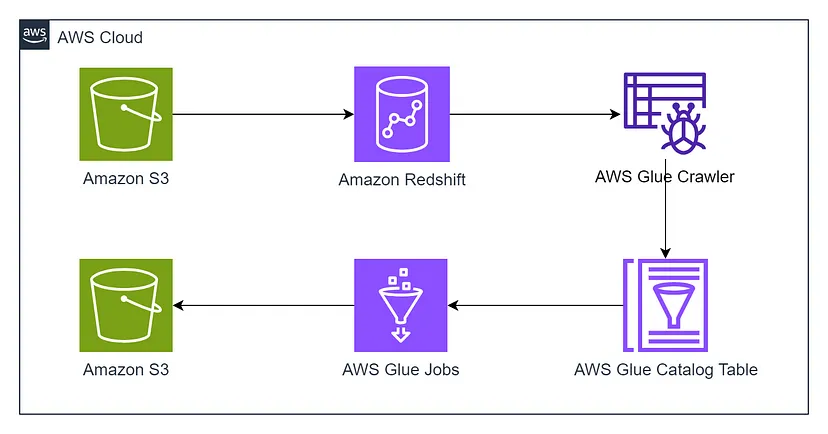
The solution architecture includes the following high level steps.
Creation of S3 bucket and uploading file in S3 bucket that is need to be loaded into Amazon Redshift.
While creating the S3 bucket, create two folder /redshift for redshift_tmp_folder and /output for storing the output result in json.
Creation of Amazon Redshift for data warehouse
We’ll start by creating an Amazon Redshift cluster and loading the data from Amazon S3 to Amazon Redshift data warehouse. The steps are outlined below:
- In the Amazon Redshift console, Select Clusters in the left.
- Select Create Cluster.
- In Cluster configuration, Give the unique name or identifier for your cluster.
- Choose the Node Type to dc2.large.
- Set the number of nodes to 1 or 2.
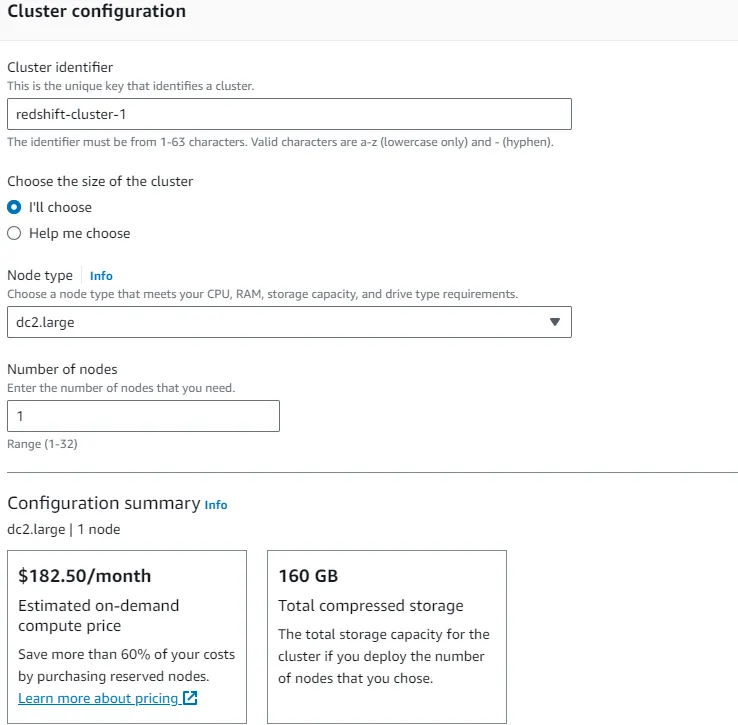
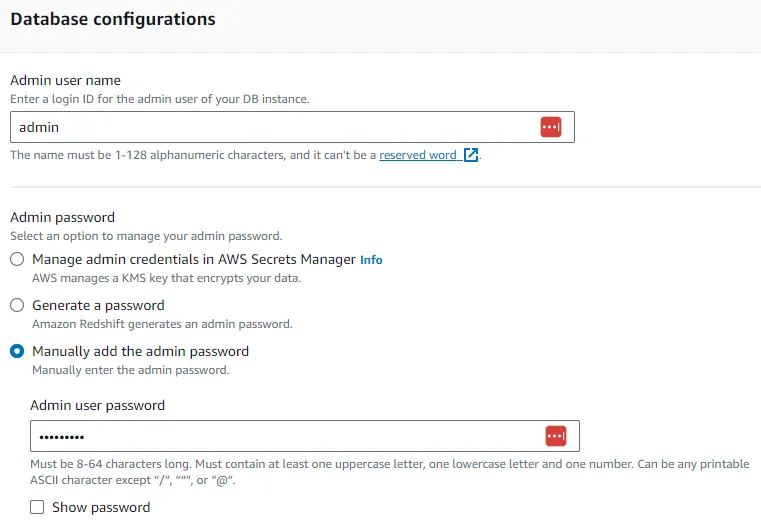
6. In the Database configurations, give the admin user name to admin, select to manually add admin password, and add it.
- In Associated IAM roles, Click Manage IAM role and click Create IAM role.

- Choose to Any S3 bucket and click Create IAM role as default.
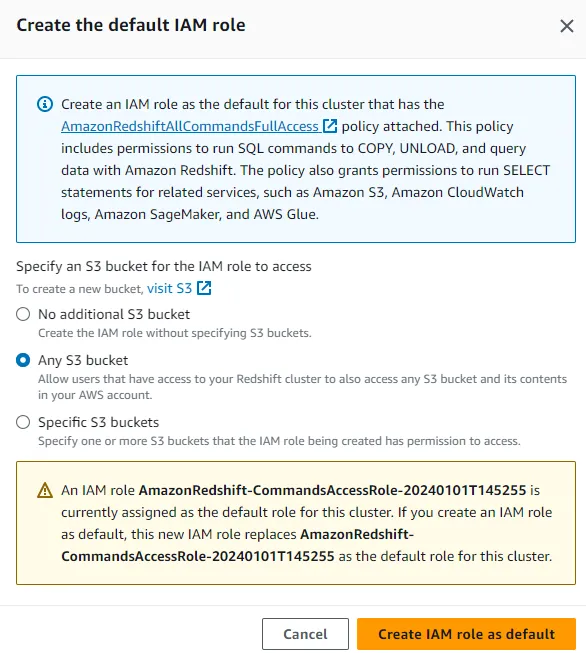
- Set other configuration as it is and finally choose Create Cluster.
10. After the cluster is created, go into your created cluster Click the Query data on your right side and select the Query in Query Editor v2.

- After that, you need to create a connection with the database. Click on your cluster name on the left side the Connection box will appear. Select the Database user name and password and add User name and Password that were added while creating the redshift cluster in step 6.
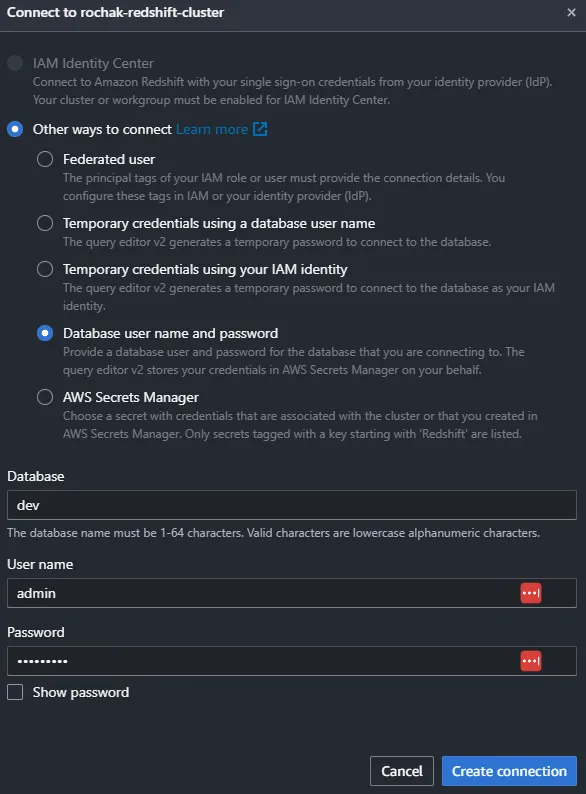
- Finally go to Create Connection.
- After the connection is established you need to load the data from S3 to the Amazon Redshift. Create a table in a redshift database according to your data and load the data. You can use the queries below:
CREATE TABLE personal_health_identifiable_information (
customer_id VARCHAR(10),
emailaddress VARCHAR(50),
firstname VARCHAR(30),
lastname VARCHAR(30),
phone VARCHAR(50)
);
COPY personal_health_identifiable_information
FROM ‘s3://<bucket-name>/<filename>’
IAM_ROLE ‘<arn-of-iam-role>’
CSV
delimiter ‘,’
region ‘<region-name>’
IGNOREHEADER 1;
Here, replace the <bucket-name> with actual S3 bucket name and <filename> with actual filename that is stored in that respective S3 bucket. Replace the <arn-of-iam-role> with the arn of iam role created in step 7–8. Replace the <region-name> with actual region name you are working on.
- To check whether the loading of data is successful or not you can run the following query.
SELECT * from personal_health_identifiable_information LIMIT 10;
If the loading is successful it gives following output.

Thus, the loading of data from Amazon S3 to Amazon Redshift is successful. Let’s move to other steps.
Creation of AWS Glue Crawler
Here, we’ll create the Glue Crawler and run it to populate the AWS Glue Data Catalogue with tables. This can be done with the following steps.
Before creating the Glue Crawler to crawl the data from Amazon Redshift we need to create the Database and Connections.
- In the AWS Glue Console, select Databases on the left.
- Click to Add Database in the right side.

3. Enter the name of your database. Lets say rochak-piidb. After that, choose Create database.

- After creation of database, go to Connections option in the left side of the AWS Glue Console.
- Click the Create connection option on Connections section.

6. In Choose data source, Select Amazon Redshift and click Next.
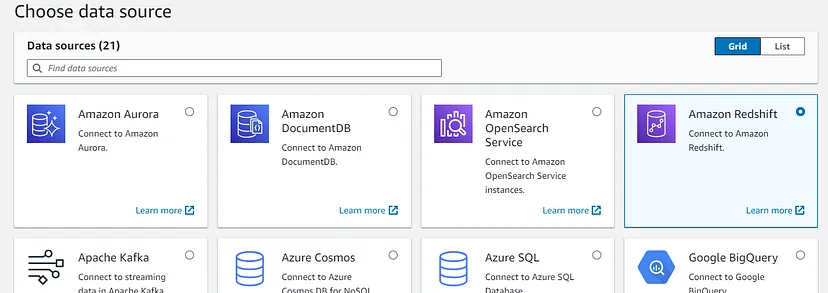
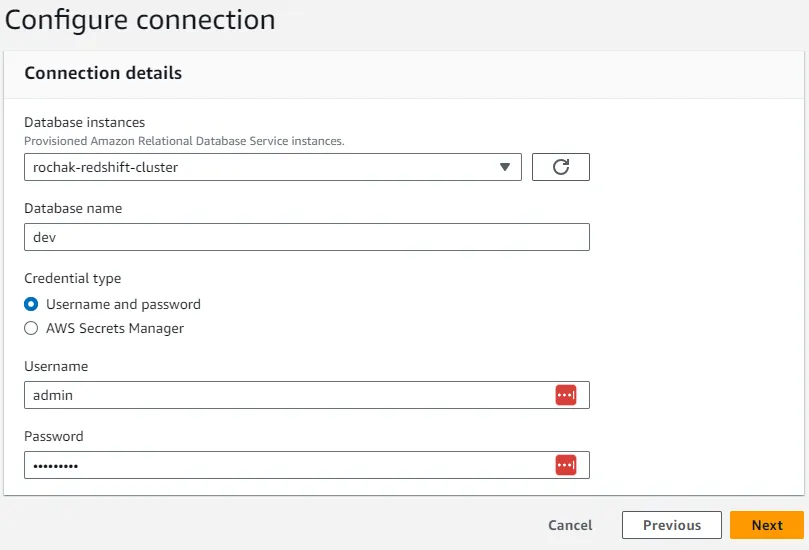
7. In Configure connection section, Choose the Database instance as the redshift cluster you have created and add Password you have created while creating that redshift cluster and click Next.
8. In Set properties section, add the name of your connection and click Next.
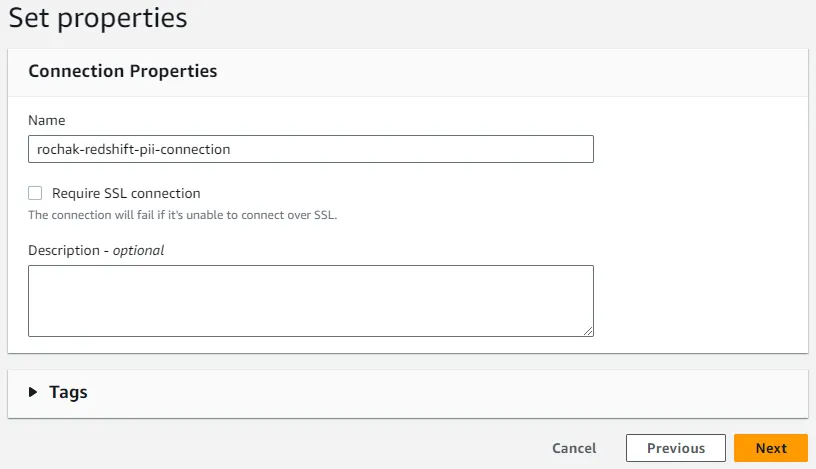
9. After reviewing, Click to Create Connection.
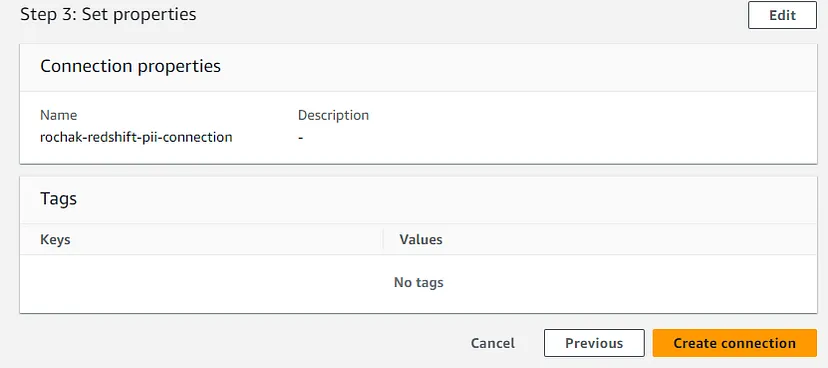
After, the successful creation of Connections, go to Crawlers in the left of the AWS Glue Console.
10. Go to Create crawler on the right of Crawlers section.

- In Set crawler properties section, add the name of your Crawler and click Next.
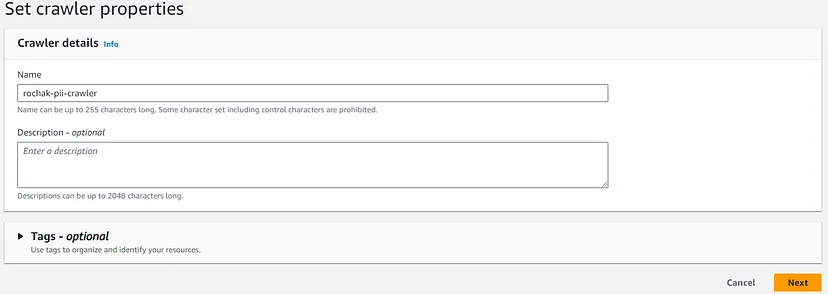
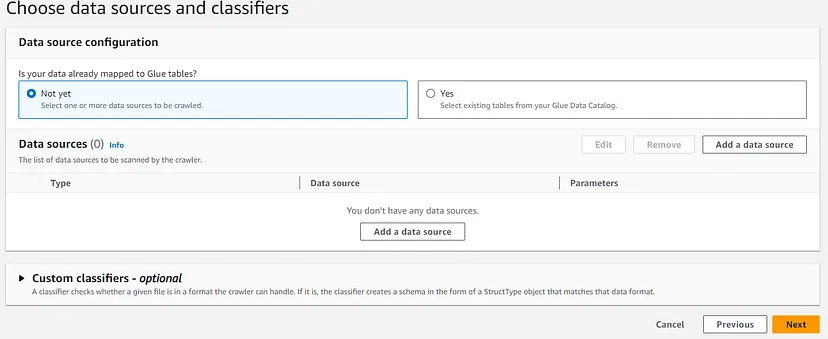
- In Choose data sources and classifiers section, click on Add a data source.
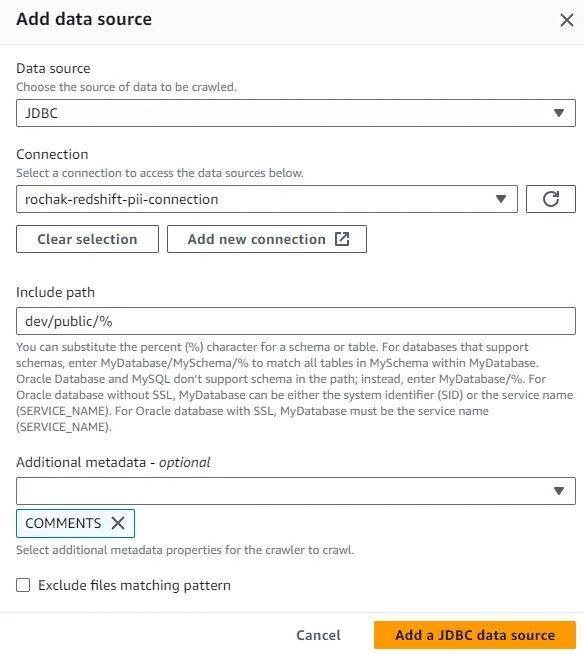
- In Add Data source section, select Data source to JDBC, add Connection you have created before, add dev/public/% in Include path. In Additional metadata field select COMMENTS. After all these configuration click to Add a JDBC data source.
- In Configure security section, add the IAM role you have created. And click Next.

Note: The iam role must have full access to Glue, Redshift and S3.
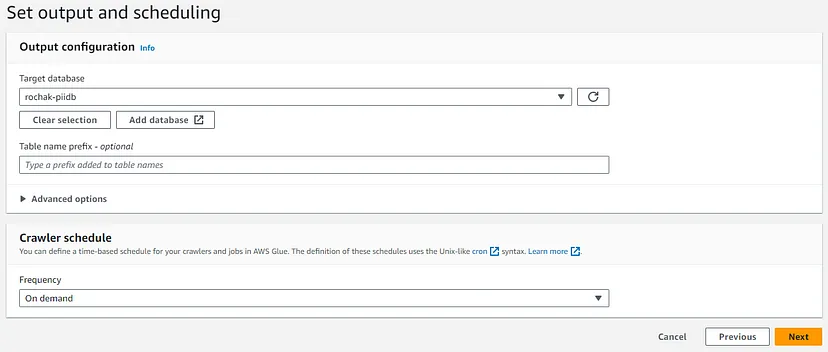
- In Set output and scheduling, set Target database to the database you have created before and leave other configuration as it is and after reviewing Create Crawler.
After successful creation of Crawler, its time to run the crawler. If we try to run the crawler it will generated the error of S3 end point configuration. So first we need to configure the endpoints. The steps are as follows.
- In VPC console, select Endpoints in the left.
- Select Create endpoint on the right of the dashboard.

3. In Create endpoint section, add the name of your endpoint. And in the Services section select s3 of type Gateway.
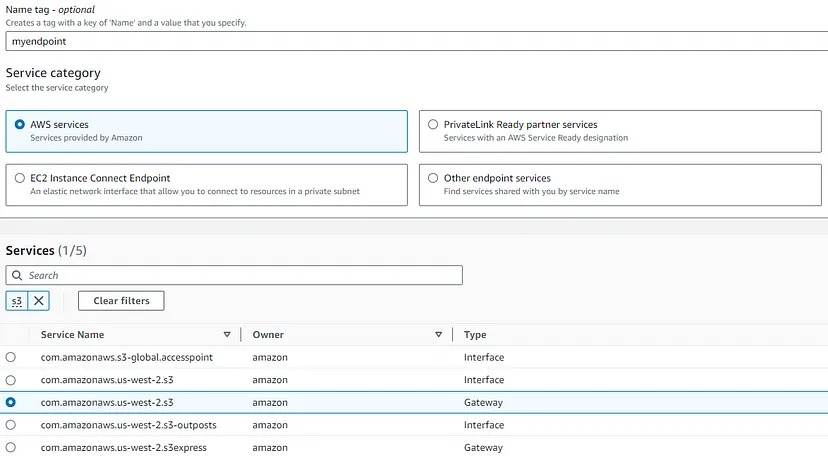
- In VPC section, Select Default VPC and on route table select all and leave other configuration as it is. Select Create endpoint.

Note: This same VPC must have been used to create the Amazon Redshift.
After successful creation of VPC endpoints, run the crawler. It will add the table in the Glue Data Catalogue. You can see the table inside the database you have created in Glue.

Run an AWS Glue Job to detect the PII data
Now, we need to write the Glue Job to detect the PII data. The steps are as follows:
- In Glue console, select ETL jobs on the left.
- In Create job section, Select Script editor.
- Add the following scripts in the editor created.
import sys
from awsglue.transforms import *
from awsglue.utils import getResolvedOptions
from pyspark.context import SparkContext
from awsglue.context import GlueContext
from awsglue.job import Job
from awsglueml.transforms import EntityDetector
args = getResolvedOptions(sys.argv, [“JOB_NAME”])
sc = SparkContext()
glueContext = GlueContext(sc)
spark = glueContext.spark_session
job = Job(glueContext)
job.init(args[“JOB_NAME”], args)
# Script generated for node AWS Glue Data Catalog
AWSGlueDataCatalog_node1704105327725 = glueContext.create_dynamic_frame.from_catalog(
database=”<database-name>”,
table_name=”dev_public_personal_health_identifiable_information”,
transformation_ctx=”AWSGlueDataCatalog_node1704105327725″,
redshift_tmp_dir = “s3://<bucket-name>/redshift/”
)
# Script generated for node Detect Sensitive Data
detection_parameters = {
“PERSON_NAME”: [{“action”: “REDACT”, “actionOptions”: {“redactText”: “******”}}],
“USA_HEALTH_INSURANCE_CLAIM_NUMBER”: [
{“action”: “REDACT”, “actionOptions”: {“redactText”: “******”}}
],
“USA_NATIONAL_PROVIDER_IDENTIFIER”: [
{“action”: “REDACT”, “actionOptions”: {“redactText”: “******”}}
],
“USA_SSN”: [{“action”: “REDACT”, “actionOptions”: {“redactText”: “******”}}],
“USA_HCPCS_CODE”: [{“action”: “REDACT”, “actionOptions”: {“redactText”: “******”}}],
“USA_NATIONAL_DRUG_CODE”: [
{“action”: “REDACT”, “actionOptions”: {“redactText”: “******”}}
],
“EMAIL”: [{“action”: “REDACT”, “actionOptions”: {“redactText”: “******”}}],
“CREDIT_CARD”: [{“action”: “REDACT”, “actionOptions”: {“redactText”: “******”}}],
“USA_DEA_NUMBER”: [{“action”: “REDACT”, “actionOptions”: {“redactText”: “******”}}],
“USA_PTIN”: [{“action”: “REDACT”, “actionOptions”: {“redactText”: “******”}}],
“USA_DRIVING_LICENSE”: [
{“action”: “REDACT”, “actionOptions”: {“redactText”: “******”}}
],
“BANK_ACCOUNT”: [{“action”: “REDACT”, “actionOptions”: {“redactText”: “******”}}],
“USA_ATIN”: [{“action”: “REDACT”, “actionOptions”: {“redactText”: “******”}}],
“PHONE_NUMBER”: [{“action”: “REDACT”, “actionOptions”: {“redactText”: “******”}}],
“USA_MEDICARE_BENEFICIARY_IDENTIFIER”: [
{“action”: “REDACT”, “actionOptions”: {“redactText”: “******”}}
],
“USA_ITIN”: [{“action”: “REDACT”, “actionOptions”: {“redactText”: “******”}}],
}
entity_detector = EntityDetector()
DetectSensitiveData_node1704105389368 = entity_detector.detect(
AWSGlueDataCatalog_node1704105327725,
detection_parameters,
“DetectedEntities”,
“HIGH”,
)
# Script generated for node Amazon S3
AmazonS3_node1704105505196 = glueContext.write_dynamic_frame.from_options(
frame=DetectSensitiveData_node1704105389368,
connection_type=”s3″,
format=”json”,
connection_options={
“path”: “s3a://<bucket-name>/output/”,
# “compression”: “snappy”,
# “partitionKeys”: [],
},
transformation_ctx=”AmazonS3_node1704105505196″,
)
job.commit()
Here, replace the <database-name> with the database you have created in AWS Glue. Replace the <bucket-name> with the bucket you have created in S3.
- Save the above Scripts and Run it.
After successful run of Glue Job, the redacted PII information are saved in the /output folder of S3 bucket in JSON format you have created.
{
“customer_id”:”3″,
“emailaddress”:”******”,
“firstname”:”******”,
“lastname”:”******”,
“phone”:”******”,
“DetectedEntities”:{
“emailaddress”:[
{
“entityType”:”EMAIL”,
“actionUsed”:”REDACT”,
“start”:0,
“end”:26
}
],
“firstname”:[
{
“entityType”:”PERSON_NAME”,
“actionUsed”:”REDACT”,
“start”:0,
“end”:5
}
],
“lastname”:[
{
“entityType”:”PERSON_NAME”,
“actionUsed”:”REDACT”,
“start”:0,
“end”:8
}
],
“phone”:[
{
“entityType”:”PHONE_NUMBER”,
“actionUsed”:”REDACT”,
“start”:0,
“end”:12
}
]
}
}
Here, we have shown the details of customer having id 3. Here, the cutomer_name, emailaddress and phone are redacted and replaced with ******.
In conclusion, with this solution, you can automatically scan the data located in redshift cluster using an AWS Glue job and identify PII, and take necessary actions. By automating the ETL process and incorporating PII detection logic, organizations can ensure compliance with data protection regulations and uphold the highest standards of privacy and security. As the volume and complexity of data continue to grow, leveraging AWS Glue becomes crucial for maintaining a trustworthy and secure data environment.
 Finland
 Bangladesh